How to Use
Setting Preferences
- Changing Your Vendio Login Information
- Changing Your Vendio Account Preferences & Settings
- Using Proxy Settings
- Setting Your Image Synchronization Preferences
- Setting your AutoSave Batch Preference
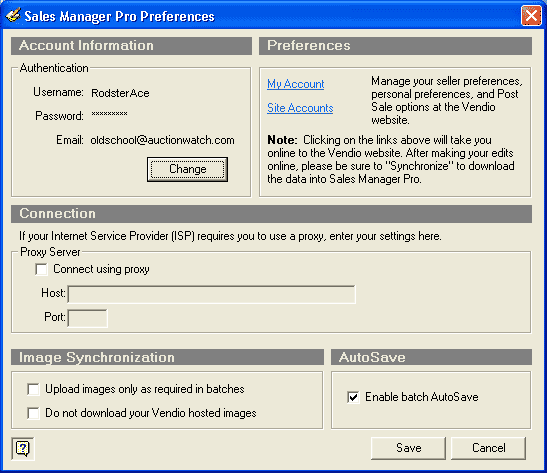
Changing Your Vendio Login Information
Sales Manager Pro stores your Vendio account username and password so it can access your online images, templates, preferences, etc. If you have changed your Vendio username and/or password online, you must update this information in Sales Manager Pro.
To change your Vendio login information:
Changing Your Vendio Account Preferences & Settings
Sales Manager Pro uses the same Vendio account preferences and settings you have online. For your convenience, links are provided to your My Account page and your Site Accounts page from the Preferences dialog box. To access the links, just click the Preferences icon in the Left Navigation bar.
Note: Whenever you change your online account preferences and settings, be sure to Synchronize to reflect the changes in Sales Manager Pro.
Using Proxy Settings
Use proxy settings only if required by your Internet Service Provider (ISP). The vast majority of users can ignore these settings. If you are not sure whether you need proxy settings, or if you do not know your proxy settings, please check with your ISP.
To enter proxy settings:
Setting Your Image Synchronization Preferences
There are two image synchronization options that can reduce your synchronization times. In a full Synchronization, all your Standard images are synchronized with Vendio Image Hosting. This means that all new images you have added to the Image Bar will be uploaded to Vendio Image Hosting, and all new images added to Vendio Image Hosting will be downloaded to Sales Manager Pro. See Synchronizing & Uploading to learn more about synchronization.
The following two synchronization options will enable partial Synchronizations by only uploading or downloading certain images.
- Upload images only as required in batches This option will only upload new Standard images that are used in a batch or batches about to be uploaded. If you have selected no batches to upload, then no Standard images will be uploaded.
- Do not download Standard images from Vendio Image Hosting
This option will not download any new Standard images that you have added online.
Note: With this option turned on, ZoomStream thumbnail images will continue to be downloaded.
To set your image synchronization preferences:
Setting your AutoSave Batch Preference
The AutoSave Batch option can substantially reduce the time it takes to save a batch, and protect you from losing your work. With AutoSave Batch turned on, Sales Manager Pro will automatically save a batch after each new listing is added or deleted. If it is a new batch, it will prompt you to Save As a file name after the first listing you create. The AutoSave Batch option reduces the time it takes to save a batch by saving as you go.
When AutoSave Batch is turned off, a batch will remain in an unsaved state until you manually save it. By default, AutoSave Batch is turned off. We recommend you turn on AutoSave Batch since it will protect you from losing unsaved batches in the event of a system crash or other failure.
To set your AutoSave Batch preference: