How to Use
Setting Preferences
- Setting Your Folder Preferences
- Setting Auto-delete Preferences
- Setting Auto-renew Preferences
- Changing Sort Order of Folder Columns
- Customizing Your View Options on the Image Hosting Page
- Customizing Your ZoomStream Viewer
Setting Your Folder Preferences
You can customize your Auto-Name, Auto-Delete, and Default Folder preferences. These allow you to automatically name folders using date format as they are created, automatically delete folders if they havent been used for a period of time, or choose your default folder. To change any of your folder preferences, go to the Image Hosting Preferences page.
- Login, and click the Image Hosting tab.
- In the left navigation bar, click on Preferences.
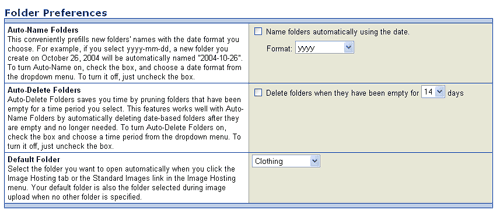
As you create folders, you can name them automatically using the following date formats:
- yyyy - Year (Example: 2004_001)
- yyyy-mm-dd - Month, Day, Year (Example: 2004-12-25_001)
- mm-dd - Month, Day (Example: 12-15_001)
- mm - Month (Example: 12_001)
Auto-Delete Folders
You can choose to delete your folders manually if they have been empty for a period of time. Use the Auto-Delete Folders dropdown menu to select the number of days you want to keep your folders before being deleted. If you want to keep your folders indefinitely, turn off this feature by unselecting the Delete folders automatically when they have been empty for checkbox. Click the Save button when you are finished.
Default Folder
You can choose the folder you want to open automatically when you click the Image Hosting tab or the Standard Images link in the Image Hosting menu. Your default folder is also the folder selected during image upload when no other folder is specified. If you want to change your default folder, use the Default Image Location dropdown menu to select another folder. Click the Save button when you are finished.
Setting Auto-Delete Preferences
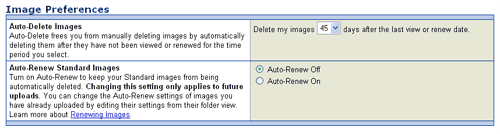
Images will be automatically deleted if they have not been viewed or renewed after a certain time period. The default period is 45 days. To increase or decrease the number of days that your images will be stored before they are automatically deleted, go to the Image Hosting Preferences page.
- Login, and click the Image Hosting tab.
- In the left navigation bar, click on Preferences.
- In the Auto-Delete Images section, choose the number of days that your images should remain in your Image Hosting account before they are automatically deleted.
- Click the 'Save' button.
- Note that when your images are automatically deleted, they will move to the Recycle Bin, where they will be stored for 14 days before being permanently deleted from your account.
Setting Auto-Renew Preferences
You can set your Auto-Renew preference globally, which will permanently store all of your future uploads. To enable Auto-Renew for all of your future images, go to the Image Hosting Preferences page.
- Login, and click the Image Hosting tab.
- In the left navigation bar, click on Preferences.
- In the Auto-Renew Images section, select the Auto-Renew On radio button.
- Click the Save button.
Changing Sort Order of Folder Columns
Within any folder view, you can customize your columns by sorting them in ascending or descending order. The current column by which a folder is sorted is always shown in bold, followed by an Up or Down arrow. An Up arrow indicates an ascending sort, e.g., A - Z, whereas a Down arrow indicates a descending sort, e.g., Z - A.
Please note that computer sorting rules work a little differently. In an ascending sort, items are listed in this order:
- Numbers from smallest to largest
- Upper case letters A - Z
- Lower case letters a - z
- On any folder view, click the column heading to sort the folder by that column.
- On any folder view, click the column heading to sort the folder by that column.
- Click the same column heading again to toggle between ascending and descending sort.
Customizing Your View Options on the Image Hosting Page
You can customize how your images will be displayed on the Image Hosting pages to make it easier for you to browse your images. To customize your view options, simply follow these steps:
- Login, and click the Image Hosting tab.
- Click the View Options tab, which appears just above your default image folder. This will open a small window displaying your available view options.
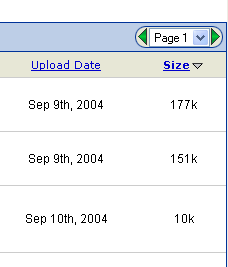
- Thumbnail
- Expiration date
- Last viewed
- Upload date
- Size
- Dimensions (For images in the ZoomStream folder only)
Customizing Your ZoomStream Viewer
You can customize the way your ZoomStream images and viewer will be displayed to browsing buyers. To customize your ZoomStream viewer, go to the ZoomStream Settings page.
- Login, and click on the My Account link at the top of the page.
- Click on the ZoomStream Images link.
Display Size
You can choose the size of the area in which you want to display your ZoomStream Images. Choosing a smaller area sends less data during each view and is ideal if you want to keep download time to a minimum. Choosing a larger area displays more of the item during each view, and is great for larger items, such as automobiles, boats, furniture, or real estate.
Image Dimensions
You can choose the dimensions that most closely correspond to the size of your ZoomStream images. Your images will be resized automatically for the best fit within the area. The most common setting is a 4 by 3 aspect ratio, which is a default camera image. If you have taller items, like a statue or antique chair, you can select a 2 by 3 aspect ratio to provide a better fit. If you sell larger items, such as an automobile or real estate, a 16 by 9 aspect ratio is ideal.
Background Color
You can change the color that appears behind your ZoomStream images. Choose a color that contrasts nicely with the dominant color in your image to get a visually appealing effect, or choose a color that matches your favorite listing template.
Buyer View Control Style
You can change the style of the control panel that allows buyers move around your image and zoom in and out.