| Home | Fully Customizable
Templates | New Improved
Preview | | Template Workshop | | Custom Listing Text | Custom Payment &
Shipping Notes | | Template Preferences | New Template
Components | | See also the New Custom Templates FAQ for more information. |
|
Template Workshop
The Template Workshop allows you to change various elements of a template, so that you can modify existing templates on your Saved Templates list, or create entirely new templates to suit your needs.
 Left-hand console Left-hand console
The Left-hand console of the Template Workshop gives you the controls to adjust all the customizable elements of the template. Choose a style category, a style and a layout to get started on customizing your template. Note that if you choose one of the styles from an "Original" category, you will only be able to modify the layout of the template. When editing one of our fully-customizable templates, you will see controls for choosing your colors, fonts, images, and borders in this console.
 Right-hand console Right-hand console
The right-hand side of the Template Workshop gives you a What-You-See-Is-What-You-Get view of your template, as you make changes to it. If you are working with one of our new template styles, click on the gray Edit buttons to customize the various elements of your template.
 Preview Preview
To see a preview of your template without the gray Edit buttons, click on the Preview button.
 Save & Close Save & Close
When you are satisfied with your template and ready to save it to your Saved Templates list, give your template an appropriate name and click on the "Save and Close" button.
 Start over Start over
If you want to start all over with a different template, discarding all the changes you've made so far, click on the "Start over" link.
|

|
 Color controls Color controls
To set colors in your template, click on the color box or the "(choose)" link underneath it in the left-hand console. The Color Picker will appear, allowing you to choose one of over 12 million colors for your template. Click on a Basic or Custom Color swatch or anywhere within the spectrum of colors in the Hue and Saturation box to get an initial color. You can also enter in the Hexadecimal value in the "Current Selected Color" text box. Click along the "Brightness" bar to to change the brightness of your currently selected color. If you have arrived at a color that you want to keep for future reference, click "Add to Custom Colors" and it will be saved as one of your 14 custom colors. Make sure to click the checkbox underneath any custom color that you don't want to be overwritten with future custom colors. When you have found a color you want for your template, click "OK".
|
|
 Font controls Font controls
The Font Controls allow you to determine four different characteristics regarding the text in various areas of your template. Click on the drop-down arrow to see the list of choices for each characteristic: you have a range of choices for your font, font size, font style (normal, bold or italic) and the font color used for the text in your template. Of course, any font-specific HTML tags you use in your description or customized text will overwrite these settings.
|
|
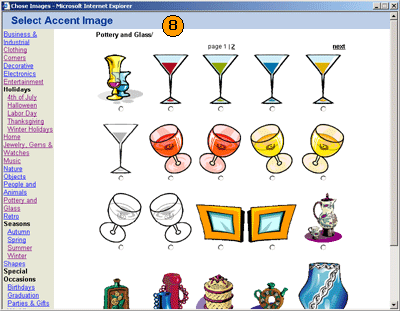
 Image Chooser Image Chooser
The Image Chooser allows you to select frames, patterns or accent graphics to use in your template. The list of links on the left-hand side of the chooser shows all the categories of frames, patterns and graphics that are available for you to choose from. On the right-hand side, click on the frame, pattern or image that you want to use in your template and click "OK". If you are a monthly subscriber to Sales Manager, you can upload your own patterns and accent graphics by clicking on the "Upload Image" link on the left-hand side.
|
|
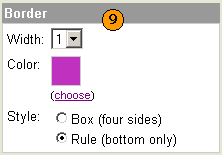
 Borders Borders
The controls for borders allow you to determine if you want a border to define the edge of various sections of your template. If you choose to have a border, it can be 1, 2 or 3 pixels wide and can be of any color you wish. You can also set the border to a 0 pixel width if you do not want it to appear.
|
|
|
|