How to Use
Synchronizing and Uploading
Back to Sales Manager Pro Help Menu
About Synchronization and Uploads
Sales Manager Pro, as an offline listing tool, often needs to communicate with Vendio online. This communication process is called Synchronization. Uploading is identical to synchronization but is used only when referring to batches. In other words, we say we upload batches and synchronize images but they both perform the same software functions.
If you are synchronizing Sales Manager Pro 6.1 for the first time, please read this important note.
Among the many things that can be synchronized/uploaded are:
User-specific data:
Vendio service-related:
There are two types of synchronization: full and partial. In a full synchronization, Sales Manager Pro will synchronize everything except the batches you do not want uploaded. In a partial synchronization, Sales Manager Pro will not synchronize certain Standard images specified in your Image Synchronization options (it will also not upload any batches you specify). The benefit of a partial synchronization is that it is faster for those times when you do not need a full synchronization. See Setting Preferences to learn more about Image Synchronization options.
About Uploading Batches
If you are using Sales Manager Merchandising Edition, uploaded scheduled listings will appear in your online Control Panel under Pending Listings. If you need to edit any pending scheduled listings, you will need to unschedule the listing, edit it, then reschedule it using Sales Manager online.
If you are using Sales Manager Inventory Edition, uploaded scheduled listings will appear on the Pending Listings page, and any newly created items will now appear as inventory items in the Unfilled Folder. If you need to edit any pending scheduled listings, you will need to unschedule the listing, edit the corresponding inventory item, then resechedule it using Sales Manager online.
Uploading a Batch
You must open a batch before you can upload it. You can upload many batches at the same time by opening all of them before initiating an upload.
- To open a batch you want to upload:
- Click the Open an Existing Batch icon from the Toolbar, or choose File > Open Batch.
- Select the batch you want to open.
- Click Open.
- Repeat to open another batch.
- To upload a batch:
- Click Upload Batch from any open Batch window, or click Synchronize from the Left Navigation bar.
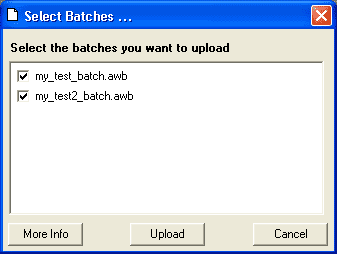
- From the dialog box that appears, deselect the batches you do not want to upload. By default, all open batches are selected for uploading.
- Click Upload to start uploading.
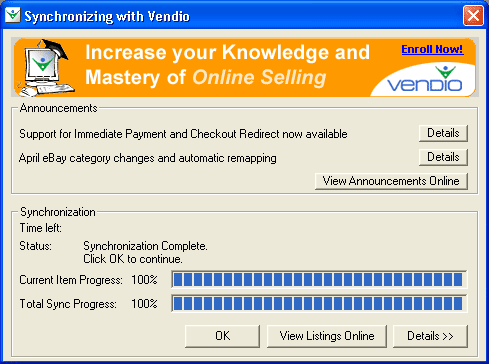
- A Synchronizing with Vendio dialog box will appear that displays the synchronization status.
- Click Details to see or hide additional synchronization details.
- Click OK to close the window.
Performing a Full Synchronization
You must first check that all Image Synchronization options are turned off to perform a full synchronization.
- To check that all Image Synchronization options are turned off:
- Click the Preferences icon in the Left Navigation bar.
- In the dialog box that appears, check that both options in the Image Synchronization section are unchecked.
- If they are checked, then click the checkboxes to uncheck them.
- Click Save.
- To start synchronizing:
- Click the Synchronize icon in the Left Navigation bar.
- If you have any batches open, a Select Batch dialog box will appear. Uncheck any batches you do not want uploaded. Click Upload to proceed.
- A Synchronizing with Vendio dialog box will appear that displays the synchronization status.
- Click Details to see or hide additional synchronization details.
- Click OK to close the window.
Performing a Partial Synchronization
You must first turn on your Image Synchronization options to perform a partial synchronization.- To check that all Image Synchronization options are turned off:
- Click the Preferences icon in the Left Navigation bar.
- In the dialog box that appears, check one or both options in the Image Synchronization section.
- Click Save.
- To start synchronizing:
- Click the Synchronize icon in the Left Navigation bar.
- If you have any batches open, a Select Batch dialog box will appear. Uncheck any batches you do not want uploaded. Click Upload to proceed.
- A Synchronizing with Vendio dialog box will appear that displays the synchronization status.
- Click Details to see or hide additional synchronization details.
- Click OK to close the window